
Planting
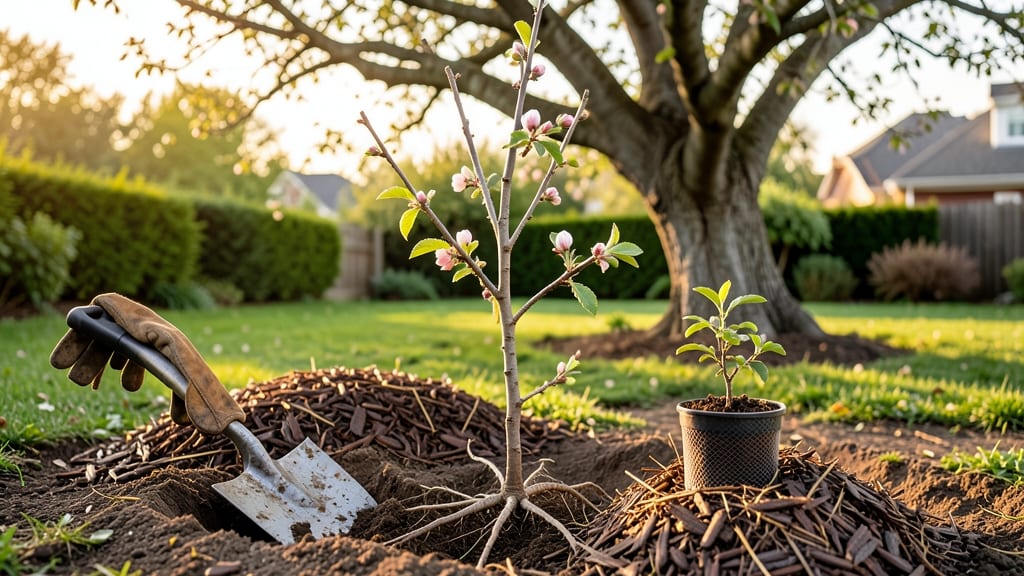
Planting an apple tree from bare roots is the first step toward decades of harvests—if you do it right. 🌳 I’ve planted six trees over the years, and the difference between a thriving orchard and a sad, stunted sapling comes down to three critical steps: soil prep, proper depth, and early pruning.
Skip any of them, and you’ll be fighting to save your tree for years.
The best time to plant is late winter or early spring, when the ground is workable but the tree is still dormant. You’ll need a 5-gallon bucket of rich compost, a shovel, and a stake to support young trees.
Dig a hole twice as wide as the root ball but no deeper—planting too low suffocates the roots and causes rot. The top of the root flare (where roots meet trunk) should sit 2-3 inches above ground level.
After planting, water deeply to settle the soil, then mulch around the base with 3-4 inches of wood chips to retain moisture and block weeds. Prune any broken branches and cut back the leader (main stem) by one-third to encourage a strong structure.
Within 3 years, you’ll see blossoms—and with patience, apples that taste like nothing from the grocery store.
Cold-hardy varieties like ‘Liberty’ or ‘Honeycrisp’ handle winter better than most, but even they need consistent watering the first two seasons. The biggest mistake? Overwatering. Let the top 2 inches of soil dry between waterings, and avoid heavy clay soil unless you amend it with sand.
Here’s where most beginners go wrong—and how to avoid it.
📚 In This Guide
- What you need
- Instructions
- Tips and common mistakes
- Wrapping up and next steps
What you need
- ● Apple tree sapling: Choose a cold-hardy variety (e.g., Honeycrisp, Fuji, or Granny Smith) suitable for your USDA hardiness zone. Opt for a 1- to 2-year-old bare-root or container-grown tree (5–6 feet tall).
- ● Shovel or spade: A round-point shovel (18–24 inches long) for digging the planting hole.
- ● Garden trowel: For fine adjustments and backfilling soil.
- ● Pruning shears: Sterilized, sharp shears (bypass pruners, 6–8 inches) to trim roots or branches.
- ● Compost or well-aged manure: 5–10 gallons to enrich the soil (avoid fresh manure—it burns roots!).
- ● Organic mulch: 3–4 inches of wood chips, straw, or pine bark to retain moisture and suppress weeds.
- ● Watering can or hose with a gentle spray nozzle: For thorough watering (aim for 1–2 gallons per week initially).
- ○ Tree stake (optional but recommended): A 4–5 foot wooden or metal stake + soft tree tie to support young trees in windy areas.
- ○ Fertilizer (optional): A balanced, slow-release fertilizer (10-10-10 or 5-10-10 NPK ratio) for planting day.
- ● Soil test kit: Check pH (ideal: 6.0–7.0) and nutrient levels before planting.
- ● Root stimulator: A mycorrhizal fungus powder or seaweed extract to boost root growth.
- ● Drip irrigation system: For consistent moisture, especially in dry climates.
- ● Tree guard or wire cage: Protects against rodents or deer in the first year.
- ● Garden gloves: Save your hands from thorns and dirt!
Step-by-step instructions for planting an apple tree
Here's how I plant cold-hardy apple trees for strong roots and early fruit production.
🌱 Step 1: Choose the Right Tree and Location
Select a dwarf or semi-dwarf variety for smaller spaces or a standard size for larger yards. Look for 1-2 year old bare-root trees in early spring—this gives roots time to establish before summer heat. I always check the USDA hardiness zone on the tag to ensure it matches my climate.
Find a spot with full sun (at least 6-8 hours daily) and well-draining soil. Avoid low areas where water pools—apple roots rot easily in soggy conditions. Test your soil's pH (aim for 6.0-7.0) and amend with compost if needed. I dig a 6-foot diameter circle around the planting site to mark the root zone.
🪴 Step 2: Dig the Planting Hole and Prepare the Tree
Dig a hole twice as wide as the root ball but no deeper—planting too deep suffocates roots. The top of the root ball should sit 2-3 inches above ground level to prevent waterlogging. Soak the bare roots in lukewarm water for 1-2 hours before planting to revive them.
Loosen any circling roots gently with your fingers—this encourages outward growth. Mix half a shovel of compost into the native soil you removed from the hole. Avoid heavy amendments like manure, which can burn tender roots. Keep the tree in its container or wrap the roots in damp burlap while you finish.
☀️ Step 3: Plant and Stake for Stability
Place the tree in the center of the hole so the root flare (where roots meet trunk) is visible above the soil line. Spread roots outward naturally—don’t force them. Fill the hole with soil, tamping lightly every 6 inches to remove air pockets. Water deeply to settle the soil and eliminate gaps.
Install a 4-5 foot stake at a 45-degree angle away from prevailing winds, then tie the trunk to it with soft tree tie material (never wire or plastic). This prevents wind rock while roots establish. Mound 2-3 inches of mulch (wood chips or straw) in a 3-inch thick ring around the base, keeping it 6 inches away from the trunk to prevent rot.
💧 Step 4: Water and Protect Newly Planted Trees
Water deeply (about 10 gallons) immediately after planting to encourage roots to spread. Then, water once a week for the first month, providing 15-20 gallons each time. You’ll know it’s enough when water drains 6 inches below the root ball. Reduce to every 2 weeks once leaves appear—overwatering is the #1 killer of young trees.
Wrap the trunk with tree guard (available at nurseries) to protect it from voles, rabbits, and deer. I also install a wire cage around the base if local critters are a problem. Avoid pruning now—let the tree focus on root growth. In Zone 3-5, add 4-6 inches of mulch in late fall to insulate roots through winter.
⏰ Step 5: First-Year Care for Strong Growth
Monitor for aphids or mites—wipe leaves with soapy water if you spot them. In late winter (just before buds swell), apply a balanced fertilizer (10-10-10) 6 inches from the trunk in a circle. Avoid fertilizing in the first year if soil is already rich. Prune only to remove dead, crossing, or diseased branches—never more than 25% of the tree in one season.
By year 3, you’ll see blossoms and tiny fruit if all went well. The key is patience—apple trees need 3-5 years to bear full crops. I mark the planting date on my calendar and check roots annually by gently scraping back soil in spring. If roots circle the hole, it’s time to air-prune (cut a few roots) to encourage outward growth.
Tips & tricks for planting cold-hardy apple trees
Planting an apple tree is a long-term investment, and these small details make all the difference between a thriving orchard and years of disappointment. I've learned these the hard way—trust me, your future fruit depends on them.
Root Revival Matters: That 1-2 hour soak in lukewarm water isn't just optional—it's essential for reviving dormant roots. I use a bucket of water mixed with a rooting hormone if I have it, but plain water works too. The goal is to wake up those roots so they'll spread eagerly into your prepared soil. Pro tip: Add a few ice cubes to keep the water cool while soaking—warm water can shock tender roots.
Soil Science That Saves Trees: The 6.0-7.0 pH range is crucial because apple trees are sensitive to both acidity and alkalinity. I test my soil annually and adjust with lime (to raise pH) or sulfur (to lower it) if needed. Remember, you're mixing half a shovel of compost into the native soil—not replacing it. This gives your tree a gentle nutrient boost without overwhelming it. The compost also improves drainage in heavy soils.
Staking Secrets: That 4-5 foot stake at a 45-degree angle isn't just decoration—it's insurance against wind damage. I use soft tree ties (available at nurseries) because they expand as the trunk grows. The key is to position the stake away from prevailing winds, which you can determine by watching how leaves fall from nearby trees. Too-tight ties can girdle the trunk as it grows, so check them annually and loosen if needed.
Watering Wisdom: The 10 gallons immediately after planting might seem like a lot, but it's what gets those roots spreading outward instead of staying tight in the hole. I use a garden hose with a slow setting to avoid eroding the soil. For the 15-20 gallons weekly, I mark my watering can with a line showing the 20-gallon level—this prevents both under- and overwatering. The 6-inch drainage test is your best friend: stick your finger in the soil after watering to check moisture depth.
Pro Tips for Plant An Apple Tree Step By Step
- Planting an apple tree is a long-term investment, and these small details make all the difference between a thriving orchard and years of disappointment.
- Root Revival Matters: That 1-2 hour soak in lukewarm water isn't just optional—it's essential for reviving dormant roots.
- Soil Science That Saves Trees: The 6.0-7.0 pH range is crucial because apple trees are sensitive to both acidity and alkalinity.
Frequently asked questions
Got questions about planting your apple tree?
Here are some of the most common ones—plus clear, practical answers to help you grow with confidence!
When is the best time to plant an apple tree?
The ideal time is late fall or early spring (before buds break). This gives roots time to establish before extreme heat or frost. Avoid planting during summer—soil stays too dry, and young trees struggle. For colder climates, plant in fall (6-8 weeks before first frost) to let roots harden off naturally. Pro tip: If you must plant in summer, water deeply 2-3x/week!
How deep should I plant the root ball?
Plant the root flare (where roots meet the trunk) just above soil level—never bury it. Dig a hole twice as wide as the root ball but no deeper. If the tree sags after planting, add more soil. Warning: Burying the flare can cause rot or girdling. Use a stake only if needed (remove after 1 year).
Can I plant an apple tree in a container or small yard?
Yes! Dwarf varieties (like ‘Columnar’ or ‘Semi-Dwarf’) thrive in containers (minimum 18" diameter) or small spaces. Use well-draining soil and a pot with drainage holes. For ground planting, ensure 6-8 feet of space between trees (or 10+ feet for standard varieties). Bonus: Containers let you move trees to optimize sunlight!
Why aren’t my new apple tree leaves turning green?
Yellow or pale leaves often mean nutrient deficiency (common in young trees). Test soil pH (ideal: 6.0–7.0) and amend with compost or a balanced fertilizer (10-10-10). Overwatering or poor drainage can also cause stress. Check for pests (aphids, mites) and treat with neem oil if needed. Quick fix: Mulch around the base to retain moisture and nutrients.
How long until my apple tree bears fruit?
Patience pays off! Dwarf trees may fruit in 2–3 years, while standard varieties take 4–6 years. Pollination is key—plant two compatible varieties (check labels) unless your tree is self-pollinating. Thin fruit in early summer (leave 6" between apples) to improve size and quality. Fun fact: Some heirloom varieties take 5+ years—choose fast-bearing types like ‘Honeycrisp’ or ‘Gala’ for quicker rewards!
Wrapping up and next steps
Planting an apple tree is a rewarding journey that blends patience, care, and a touch of magic—especially when you imagine those first sweet bites in just a few years! 🍏 By following these step-by-step instructions, you’ve equipped yourself with everything needed to nurture a thriving tree, from selecting the perfect variety to giving it the love it deserves.
Remember, even the most resilient roots start small, and with time, your efforts will flourish into a bountiful harvest.
Now that you’re ready to dig in (literally!), take the next step: mark your calendar for seasonal tasks like pruning, fertilizing, or even sharing your progress with fellow gardening enthusiasts. Happy planting—your future apple orchard awaits! 🌱