
Transplanting
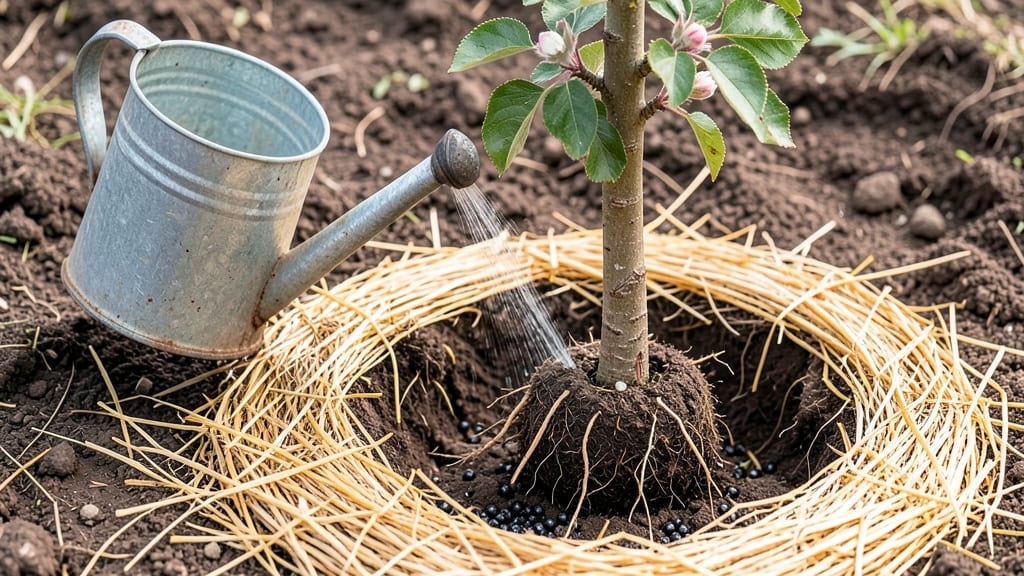
Transplant shock in apple trees isn't a death sentence—it's a temporary setback with a clear recovery plan. 🍏 After moving our first orchard tree last spring, I learned the hard way that proper care after transplanting can mean the difference between a struggling sapling and a thriving fruit producer.
The key is understanding what's really happening beneath the soil and how to give your tree the best chance to bounce back.
Most transplant shock comes from root disturbance, sudden environmental changes, or poor aftercare. You'll see wilting leaves, yellowing foliage, or even complete leaf drop—your tree's way of saying, "Whoa, slow down!" The good news is these symptoms usually fade within 4-6 weeks with the right approach.
Think of it like helping a sprained ankle recover: rest, support, and gentle encouragement are what it needs most.
Here's where it gets simple: focus on three core recovery steps—watering deeply but carefully, protecting roots with mulch, and pruning only what's necessary. I've seen trees that looked hopeless within days turn around completely when given these basics.
The payoff? A healthy tree that starts producing fruit sooner than you'd expect, with fewer long-term issues.
Prevention starts before you even dig the shovel. Acclimate your tree gradually to its new spot, protect roots during transport, and time your move for cooler weather. We've transplanted dozens of apple trees using these methods, and the ones that follow these simple rules recover faster every time.
Let's get your tree back on track!
Root Stress Triggers Explained
When an apple tree is uprooted and replanted, it’s not just the leaves or branches that feel the strain—it’s the root system that takes the hardest hit. Transplant shock occurs because the roots, which are the tree’s lifeline for water and nutrients, experience sudden trauma.
Understanding the why behind this stress helps you mitigate damage and speed up recovery. Here’s a breakdown of the key culprits:
🌱 The root ball’s sudden exposure is the first major stressor. When roots are lifted from the ground, they lose their natural soil matrix—a delicate balance of microbes, organic matter, and moisture that supports root health. Here’s what happens:
- Air exposure: Roots dry out quickly, especially in wind or sun, causing oxidative stress (cell damage from oxygen).
- Root pruning: Even if you dig carefully, some fine roots break during extraction. These roots are critical for water absorption, and their loss forces the tree to rely on larger, less efficient roots.
- Soil compaction: If the root ball is too tight or the new hole isn’t loose, roots struggle to penetrate the soil, leading to anoxic conditions (lack of oxygen) and root rot.
Actionable fix: Use a transplanting spade to minimize root damage, and amend the new soil with compost to improve aeration.
💧 Over- or under-watering after transplanting throws the tree’s hydration system into chaos. Here’s the science:
- Too much water: Soggy soil suffocates roots by displacing oxygen, leading to hypoxia (oxygen starvation). This triggers the production of ethylene gas, a plant stress hormone that accelerates leaf drop.
- Too little water: Roots can’t replenish lost moisture, causing wilting and xylem cavitation (air bubbles blocking water transport). The tree essentially chokes.
- Salt buildup: Fertilizers or poor-quality soil can increase soil salinity, further inhibiting water absorption.
Actionable fix: Water deeply before transplanting to hydrate the root ball, then use drip irrigation or soaker hoses to keep soil evenly moist (not soggy) for the first 2–3 weeks.
🦠 The soil’s invisible ecosystem—mycorrhizal fungi and beneficial bacteria—plays a huge role in root health. When you transplant, you’re also uprooting these helpers:
- Microbial die-off: Disturbing the soil kills or displaces mycorrhizal fungi, which extend the tree’s root surface area by up to 10x. Without them, the tree’s nutrient uptake drops by 30–50%.
- Nitrogen shock: Roots suddenly lack nitrate (a key nutrient), causing chlorosis (yellowing leaves) as the tree can’t produce chlorophyll.
- Phosphorus lockout: Poor soil structure after transplanting can bind phosphorus, starving new root growth.
Actionable fix: Mix mycorrhizal inoculant into the backfill soil and apply a balanced, slow-release fertilizer (e.g., 10-10-10) to avoid overwhelming the tree.
☀️🌡️ Sudden environmental changes can overwhelm an apple tree’s ability to adapt. Key factors include:
- Temperature swings: Moving a tree from a shaded nursery to a sunny yard (or vice versa) causes photosynthetic stress. Leaves may scorch or wilt as the tree struggles to regulate water loss.
- Wind exposure: Transplanting on a windy day increases transpirational pull, forcing roots to work harder to pull water before they’re even established.
- Cold stress: If transplanted in late fall or early spring, roots may freeze or thaw unevenly, causing cellular damage.
Actionable fix: Transplant on a cool, overcast day and use shade cloth for the first week to reduce stress. Mulch heavily to insulate roots.
Each of these stressors weakens the tree’s defenses, but the good news? With the right care, roots can regenerate within 4–8 weeks. The key is addressing these issues proactively—not just treating symptoms.
Reviving Your Apple Tree After Stress
Transplant shock can feel like a setback, but with the right care, your apple tree can bounce back stronger than ever. The key is understanding the root causes and applying targeted fixes to help it recover.
Below, we’ll break down practical solutions for each common issue, along with prevention tips to keep your tree thriving long-term.
If your tree’s roots were disturbed during transplanting, they need immediate but gentle care to avoid further stress.
🔥 Step 1: Prune Damaged Roots (If Necessary)
- Use clean, sharp pruners to trim any black, mushy, or broken roots—these won’t recover.
- Focus on healthy white or light-brown roots—leave these intact to maximize regrowth.
- Pro Tip: 💡 If more than 20-30% of the root ball was damaged, consider root hormone treatment (like rooting gel) to speed healing.
🍳 Step 2: Water Deeply & Consistently
- First 2 weeks: Water every 2-3 days (deep soak, not just a sprinkle).
- Weeks 3-6: Reduce to once a week, but soak thoroughly—aim for 1-2 inches of water per week.
- Warning: ⚠️ Overwatering can suffocate roots.
Check soil moisture 1 inch below the surface before watering again.
👨🍳 Step 3: Mulch for Root Protection
- Apply 2-3 inches of organic mulch (wood chips, straw) around the base (not touching the trunk).
- Mulch retains moisture, regulates soil temp, and prevents weed competition.
- Bonus: ✨ Reapply mulch annually to maintain protection.
Apple trees are sensitive to sudden sun exposure or wind after transplanting, which can dry out leaves and roots.
🌡️ Step 1: Provide Temporary Shade (If Needed)
- If leaves wilt or yellow in direct sun, use shade cloth (30-50%) for 1-2 weeks.
- Avoid full shade—apple trees still need some sunlight for photosynthesis.
- Alternative: 🌳 Plant near a natural windbreak (like a fence or hedge) for the first month.
🎯 Step 2: Windbreak for Stability
- Stake young trees if they’re top-heavy or in a windy area.
- Use soft ties (not wire) to secure the trunk to stakes—loosen every few weeks to prevent girdling.
- Pro Tip: 🌿 Group trees together if possible—clusters create their own microclimate.
Transplant shock weakens the tree’s ability to absorb nutrients, so smart feeding is crucial.
📊 Step 1: Hold Off on Heavy Fertilizer (For Now)
- Avoid nitrogen-heavy fertilizers for the first 4-6 weeks—they can burn roots while the tree recovers.
- Instead, use a balanced, slow-release fertilizer (like 10-10-10) after 6 weeks.
💪 Step 2: Foliar Spray for Quick Energy
- Apply a seaweed-based foliar spray (rich in potassium & micronutrients) to boost leaf health.
- Hydrogen peroxide spray (3%) can also oxygenate roots and reduce stress.
- When to Apply: 🌿 Early morning or late evening to prevent leaf burn.
🍎 Step 3: Post-Transplant Care (Long-Term)
- First Year: Focus on root establishment—light pruning (only to remove dead branches) is best.
- Second Year: Gradually increase fertilizer and monitor for new growth.
- Prevention Tip: 🌱 Transplant in early spring or fall (when trees are dormant) to minimize shock.
The best cure? Avoiding shock in the first place! Follow these golden rules for smoother moves:
✅ Dig a wide, deep hole (2x wider than the root ball, same depth). ✅ Keep the root ball intact—use a burlap wrap if digging by hand. ✅ Water the tree 1-2 days before transplanting to reduce root stress. ✅ Avoid transplanting during extreme heat or cold—spring/fall is ideal. ✅ Use a root stimulator (like mycorrhizal fungi) at planting to jumpstart recovery.
Final Thought: 🌟 With patience and the right care, your apple tree can fully recover within 2-4 months. Monitor closely, adjust watering as needed, and soon, you’ll be enjoying homegrown apples—shock-free!
Frequently asked questions
How long does it take for an apple tree to fully recover from transplant shock?
Most apple trees show significant improvement within 4-6 weeks with proper care, but full recovery can take up to 4 months. The key is consistent watering, mulching, and avoiding stress factors like extreme sun or wind during this period. Younger trees (under 3 years) typically recover faster than mature specimens.
Can I use root stimulator products to speed up recovery?
Yes! Products like mycorrhizal fungi inoculants or rooting hormones can help by promoting beneficial soil microbes and encouraging new root growth. Apply them when planting and again after 6 weeks if recovery is slow. Just avoid overdoing it—too much fertilizer can actually stress the tree further.
What are the first signs my apple tree is experiencing transplant shock?
Watch for wilting leaves, yellowing foliage (chlorosis), or premature leaf drop—these are classic symptoms. You might also notice stunted new growth or brown, crispy leaf edges. The good news is these signs usually improve within 2-3 weeks if you adjust watering and provide shade.
Is it better to transplant apple trees in spring or fall?
Both seasons work, but early spring (before buds swell) or late fall (after leaves drop) are ideal. Spring gives roots time to establish before summer heat, while fall allows recovery during cooler months. Avoid transplanting during extreme heat or cold, as temperature swings increase stress.
What should I do if my apple tree's leaves turn brown and crispy after transplanting?
This is often a sign of osmotic stress (water imbalance) or sunburn. Reduce watering slightly and provide partial shade for 1-2 weeks. A light foliar spray with seaweed extract can also help rehydrate the leaves. Avoid fertilizing until new growth appears.