
Pruning
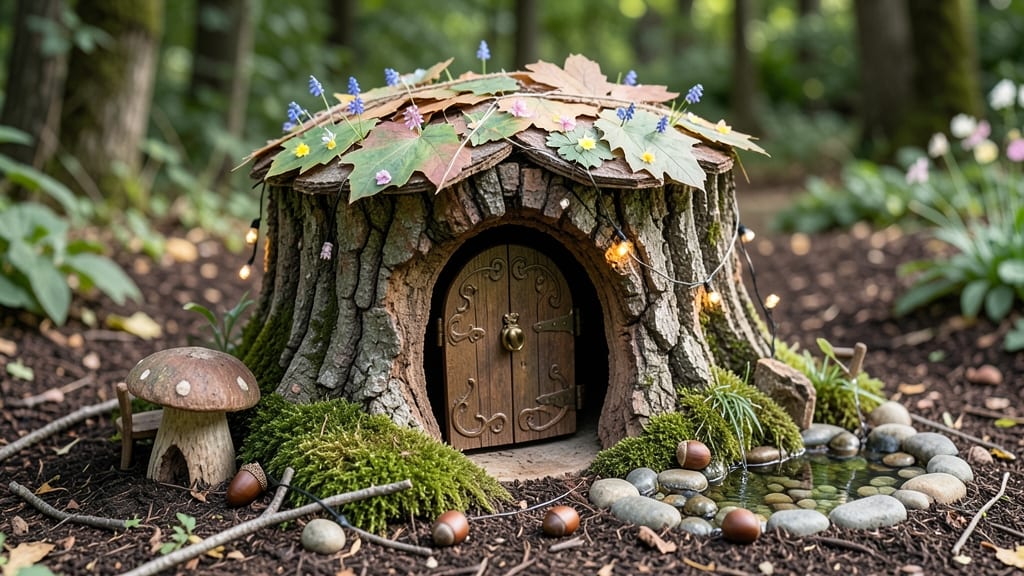
Building a fairy house out of a tree stump turns an ordinary garden feature into an enchanting focal point using foraged materials like lichen, pebbles, and small branches. Begin with a clean, dry stump as your base, then craft tiny walls and roofs with organic layers for a dreamy, earthy aesthetic that harmonizes with your landscape.
A tree stump's natural hollows and textures make it the perfect canvas for fairy house construction.
The key is selecting one with interesting contours—whether a flat top for a roof or a deep crevice for a doorway—then using materials you can find in your own yard. 🌿 I love how a simple stump can become a miniature village when you add moss for walls, acorn caps as shingles, and tiny flower petals for windows.
The beauty of this project lies in its imperfection; the more rustic the materials, the more magical the result feels over time.
For a long-lasting creation, focus on weather-resistant elements like cedar bark or pinecones, and avoid delicate flowers that won't survive rain. A little glue or waterproof sealant on the base can extend your fairy house's lifespan while keeping it looking fresh.
The best part? This project encourages kids (and adults!) to connect with nature while developing their creativity.
💡 In This Article
- Choosing and Preparing Tree Stumps for Fairy Houses
- Natural Materials for Building Whimsical Fairy Stump Homes
Choosing and preparing tree stumps for fairy houses
The ideal tree stump for a fairy house should be 6-12 inches in diameter—large enough to create distinct architectural features but small enough to handle with basic tools. Look for stumps with natural hollows, cracks, or flat surfaces that can serve as doorways or windows.
A partially decayed stump (with soft, crumbly wood) is perfect because it's easier to carve, but avoid stumps that are too rotten, as they won't hold materials well.
The bark should be intact or easily removable to reveal the wood's natural grain, which adds texture and character to your fairy home.
Before transforming your stump, clean it thoroughly to remove dirt, moss, or insects. Use a stiff brush and soapy water to scrub away grime, then let it dry completely in sunlight for 2-3 days—this prevents mold growth and makes materials adhere better.
For shaping, sand the edges with 80-120 grit sandpaper to smooth rough spots, then use a chisel or small saw to carve out doorways or window frames. The goal is to enhance the stump's natural features without overworking it; think of it as sculpting with nature's tools. 🌟
Preserving the stump's integrity is key—avoid drilling too deep, as this can weaken the structure. Instead, use lightweight materials like twigs or thin bark slices to create walls and roofs. If your stump is too dry, lightly mist it with water before attaching materials to help them stick.
For extra durability, apply a thin layer of waterproof wood glue to the base before adding moss or pebbles, but keep it minimal to maintain the organic look. The magic happens when the stump's natural imperfections become part of the design.
Seasonal considerations matter too. In wet climates, opt for stumps with natural overhangs or place your fairy house under a roof (like a larger leaf or bark piece) to shield it from rain.
For winter projects, use evergreen materials like pine needles or cedar bark, which hold up better in cold weather. The stump's position in your garden also affects its longevity—place it in a shaded spot to slow material degradation and reduce exposure to harsh sunlight.
A well-prepared stump is the foundation of a fairy house that feels alive and inviting year-round.
Don't overlook the stump's base. If it's uneven, level it with a small amount of potting soil or pebbles to create a stable foundation. This also helps with drainage, preventing water from pooling and rotting your materials.
For added charm, arrange small stones or acorns around the base to mimic a fairy pathway. The preparation stage sets the tone for your entire project—take your time here, and your fairy house will stand the test of time and weather. ✨