
Pruning
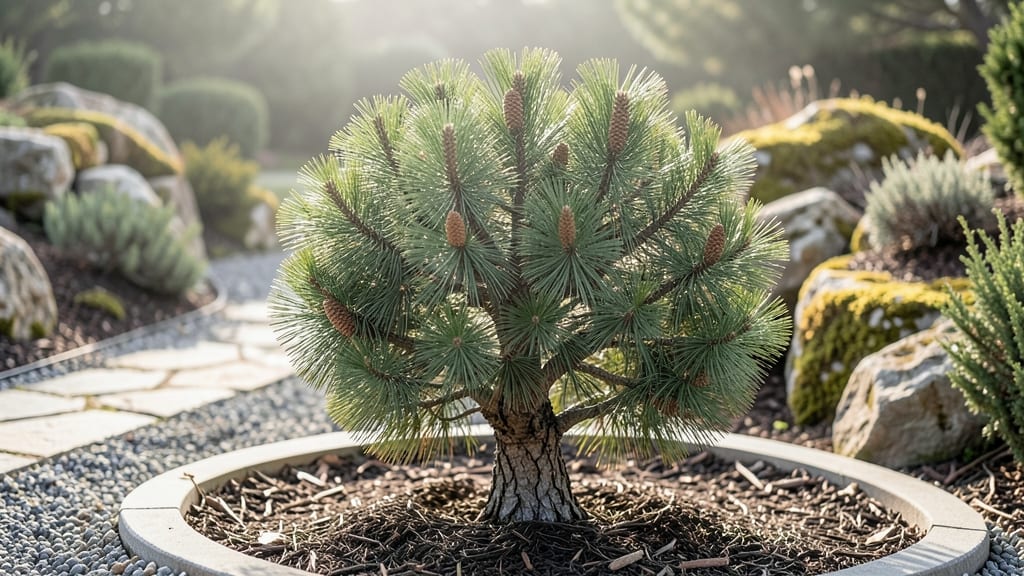
Growing a real mini pine tree transforms any space into a cozy forest corner. 🌲 These hardy evergreens—like Pinus mugo—thrive in containers, offering year-round texture without the space of a full-sized tree.
My first one started as a 3-inch sapling and now stands proudly at 3 feet, perfect for patios or windowsills. The secret lies in their adaptability: they handle partial shade, tolerate dry soil, and even bounce back from winter cold.
You’ll need a well-draining mix (think 60% potting soil, 30% perlite, 10% sand) and a container with drainage holes—no fancy tools required. Water deeply once a week, but let the top inch dry between soakings to avoid root rot. Pruning keeps them compact and bushy.
Snip back leggy branches in early spring, and shape as needed—these pines respond beautifully to gentle trimming. Within a year, you’ll have a lush, fragrant centerpiece that smells like a mountain breeze. Perfect for small gardens, balconies, or even bright indoor spots. Common challenges?
Watch for spider mites (spray with neem oil) and root-bound issues (repot every 2–3 years). With the right care, your mini pine will outlive you—and keep looking fresh through all four seasons.
📚 In This Guide
- What you need
- Instructions
- Tips and common mistakes
- Wrapping up and next steps
What you need
- ● Mini pine tree (real): Choose a dwarf variety like Pinus mugo (mugo pine) or Pinus sylvestris (Scots pine, dwarf cultivars). Size: 1–3 feet tall (potted or bare-root). Healthy foliage with no brown needles or pests.
- ● Container: Size: 10–15% larger than the root ball (e.g., 12–18" diameter for a 3-ft tree). Material: Terracotta (breathable) or plastic (retains moisture). Drainage holes: Mandatory to prevent root rot.
- ○ Potting mix: Type: Well-draining blend (e.g., 60% pine bark fines, 30% perlite/pumice, 10% peat moss or coconut coir). Optional: Add slow-release fertilizer (10-10-10 ratio) for a nutrient boost.
- ● Pruning tools: Bypass pruners (sharp, clean) for clean cuts. Hand pruners (for smaller branches). Loppers (if dealing with thicker growth).
- ● Mulch: Type: Pine bark mulch or gravel (1–2" layer). Purpose: Retains moisture and regulates soil temp.
- ● Gloves (gardening or work gloves to protect hands from sap and sharp needles).
- ● Watering can with a fine rose (or hose with gentle spray).
- ● Trowel (for repotting or amending soil).
- ● Spray bottle (for misting needles if indoors).
- ● Sunlight access: Outdoor: Full sun (6+ hours/day). Indoor: Bright, indirect light (south-facing window or grow lights).
- ● Patience! 🌱 Dwarf pines grow slowly—prune lightly to maintain shape.
- ● Decorative stones or moss for a naturalistic container look.
- ● Slow-release fertilizer tablets (place 1–2 in the soil at planting).
- ● Indoor humidity tray (pebbles + water) for winter care.
- ● Tree stakes or a small trellis (if training the tree to grow upward).
How to grow and maintain miniature pine trees in containers
Bring evergreen elegance to your space with these charming, low-maintenance pines.
🪴 Step 1: Select the Right Miniature Pine Variety and Pot
Choose a dwarf pine variety like Pinus mugo 'Mops' or Pinus sylvestris 'Beuvron'—both stay under 3 feet tall and thrive in containers. The pot should be 12-18 inches wide with drainage holes, and I recommend unglazed terra cotta for breathability. If your pot lacks holes, drill 2-3 extra near the bottom to prevent root rot.
Fill the pot with 3-4 inches of gravel or coarse sand at the bottom for drainage. This layer ensures excess water flows out instead of pooling around roots. Press it down lightly—you want it firm but not compacted. The right pot and drainage setup keeps your pine healthy year-round.
🌱 Step 2: Plant with Well-Draining Soil and Position for Light
Use a fast-draining potting mix (I blend 50% peat moss, 30% perlite, and 20% coarse sand). Fill the pot ¾ full, leaving space at the top for watering. Gently remove the pine from its nursery pot and loosen any circling roots with your fingers—this encourages outward growth.
Place the pine in the center of the pot, then backfill with soil, pressing lightly to eliminate air pockets. Leave 1 inch of space between the soil and pot rim to avoid spills. After planting, water deeply until water runs freely from the drainage holes. This initial soak helps settle the soil and removes air gaps.
☀️ Step 3: Place in Bright, Indirect Light and Water Consistently
Miniature pines need 6+ hours of bright, indirect light daily—a south or east-facing window works best. Avoid harsh afternoon sun, which can scorch needles. If your space lacks natural light, supplement with a grow light kept 12-18 inches away for 12-14 hours per day. You’ll notice new growth in 4-6 weeks if light conditions are right.
Water when the top 1-2 inches of soil feel dry to the touch. Stick your finger in—if it comes out clean, it’s time to water. Overwatering is the biggest killer of container pines, so always check before adding more moisture. In winter, reduce watering to every 2-3 weeks, as growth slows dramatically.
✂️ Step 4: Prune and Fertilize for Year-Round Health
Prune in late winter or early spring to shape the tree and encourage fullness. Use clean, sharp pruning shears to trim back 1/3 of the new growth from the previous year. Focus on removing dead or overcrowded branches, cutting just above a healthy bud. This keeps the pine compact and bushy—never prune more than 20% of the foliage in one session.
Fertilize once in early spring with a slow-release, acid-loving plant fertilizer (like 10-10-10). Follow the package instructions, but halve the dose if your pine is in a small pot. Avoid fertilizing in fall or winter, as the tree enters dormancy. Yellowing needles often signal over-fertilization—cut back immediately if you see this.
⏰ Step 5: Protect from Pests and Winter Conditions
Inspect your pine weekly for spider mites or aphids, which love dry conditions. If you spot tiny webs or sticky residue on needles, spray with neem oil (mix 1 tbsp per quart of water) and repeat every 5 days until pests disappear. I’ve found neem oil works faster than soapy water and won’t harm the tree.
In winter, move your pine to a cool but unheated space (like a garage or sunroom) where temperatures stay between 35-50°F. Avoid drafts or sudden temperature swings, which stress the tree. If you must keep it indoors, increase humidity by placing the pot on a tray of pebbles and water—this mimics outdoor moisture levels and prevents needle drop.
Tips & tricks for perfect miniature pine tree care
These simple tricks will help your container pine thrive year-round without the guesswork.
Drainage is Everything: I can't stress this enough—those 3-4 inches of gravel or coarse sand at the bottom aren't optional. I've seen pines drown in pots with "just a few holes," so if your container lacks drainage, drill those 2-3 extra holes near the bottom. The goal is to mimic natural forest conditions where water drains away from roots. Pro tip: Tap the pot gently after planting to check for loose gravel—it should stay firm but not packed like concrete.
Soil Science Matters: That 50-30-20 mix of peat moss, perlite, and sand isn't just random numbers. The peat moss holds moisture, perlite creates air pockets, and sand prevents compaction. I've had great success adding ½ cup of orchid bark to the mix for extra aeration. If you're using store-bought potting soil, amend it with 20% coarse sand—regular potting mix stays too wet and suffocates roots. The right soil mix makes all the difference between a thriving pine and one that struggles.
Light Check: Those 6+ hours of bright, indirect light are non-negotiable, but here's how to test your spot: Place your hand near the window where your pine will sit. If you can feel warmth but no direct sunlight on your skin, that's perfect. South-facing windows are ideal, but east-facing works too. If you're using a grow light, position it 12-18 inches away—closer than that can scorch delicate needles. I've seen pines develop brown patches from light that was too intense, so when in doubt, move it back a few inches.
Winter Prep: Don't just shove your pine in a cold corner—transition it gradually. Start moving it to cooler spaces 2 weeks before temperatures drop below 50°F. The 35-50°F range is perfect, but sudden drops below 35°F can shock the tree. I place mine near an unheated garage window where it gets morning sun but stays protected from wind. For extra insurance, wrap the pot in bubble wrap (leave the top open) to shield roots from temperature swings.
Pro Tips for Mini Pine Tree Real
- These simple tricks will help your container pine thrive year-round without the guesswork.
- Drainage is Everything: I can't stress this enough—those 3-4 inches of gravel or coarse sand at the bottom aren't optional.
- Soil Science Matters: That 50-30-20 mix of peat moss, perlite, and sand isn't just random numbers.
Frequently asked questions
Got questions about keeping your mini pine tree real thriving in containers? You’re not alone! Here are the most common inquiries—plus straightforward answers to help you grow with confidence.
Can a real mini pine tree survive year-round in a container?
A real mini pine tree (like Pinus mugo or Picea pungens cultivars) can thrive year-round in containers, but it needs the right care. Choose cold-hardy species, use well-draining soil, and protect roots from extreme temps with mulch or a frost blanket in winter. Containers dry out faster—water deeply but avoid soggy soil!
How often should I water my mini pine tree in a pot?
Watering depends on climate, but a general rule: check soil moisture weekly. In hot/dry weather, water every 5–7 days; in cooler months, every 10–14 days. Stick your finger 2 inches into the soil—if it’s dry, water until it drains from the bottom. Overwatering is the #1 killer!
Do I need to prune a mini pine tree, and when?
Pruning keeps your mini pine shapely and healthy. The best time is late winter or early spring (before new growth starts). Use clean, sharp shears to trim dead branches or shape it gently. Avoid heavy pruning—pines grow slowly! Pro tip: Never cut into old wood; focus on new growth only.
What’s the best soil mix for a container-grown mini pine?
Use a fast-draining mix like 60% potting soil, 30% perlite/pumice, and 10% sand or bark. Avoid heavy garden soil—it compacts and suffocates roots. Add a slow-release fertilizer (like 10-10-10) in spring for a nutrient boost. Drainage holes in the pot are a must!
Why are the needles turning brown on my mini pine tree?
Brown needles usually mean overwatering, underwatering, or stress. Check soil moisture first—if it’s soggy, let it dry out. If the pot is bone-dry, water thoroughly. Other causes? Sunburn (move to partial shade) or pests (like spider mites). Inspect branches closely for tiny webs or eggs.
Can I grow a mini pine tree indoors year-round?
While possible, most mini pines prefer outdoor life—they need fresh air, sunlight, and seasonal temperature changes. If you must keep it indoors, place it near a south-facing window (6+ hours of light daily) and use a grow light in winter. Humidity is key—mist leaves or use a pebble tray to mimic outdoor conditions.
Wrapping up and next steps
Bringing a mini pine tree real into your space isn’t just about aesthetics—it’s about creating a cozy, evergreen haven that thrives year-round. Whether you’re a pruning pro or a beginner, these tips will help you nurture a lush, healthy tree in containers with ease. 🌲✨
Now that you’re equipped with the right tools and knowledge, why not take the next step? Start small—pick a sunny spot, grab your shears, and give your mini pine the love it deserves! Your future green thumb (and your home’s charm) will thank you.